Wednesday, 15 Jun 2011
Hemming the new curtains – a tutorial-ish sort of thing
I went on a bit of a curtain rampage – I was thoroughly sick of the ones we had in our living room and study. Why I was sick of them when I’d personally picked them out? Curtains in Singapore tend to be of the really obiang nature – overly ornate, overly fussy, shiny, gilt, scrolls and ugly flowers all over them. I hate hate hate. Luckily my bedroom curtains are utterly gorgeous – full-length, thick blue, white and maroon stripes of a heavy fabric that doesn’t let light in. In fact I’d gone back to the shop where my mother had found those curtains, but they didn’t have a single piece in a modern shade and pattern like the bedroom curtains. It was terribly frustrating. The ones I’d eventually purchased for the house were as simple as I could find, but the colors were dull and blah (beige and olive) and it finally got to me.
These were my old, olive, blah curtains. It actually has quite a nice leaf print on it but it turned out not to be very visible :/
I went scouting for curtains and after lots of looking, the best places to get more modern curtains seem to be Spotlight and Ikea. I even went to the expensive shops and all their curtain fabric is just so…old-fashioned yuck. Seriously, who wants velvet roses on shiny brocade? I could vomit. Why is it so hard to find nice solid stripes, or even polka dots, or a modern pattern in nice bold colors? Even at Spotlight, where there were nicer patterns, most of the curtains are pencil pleat, which is also old-fashioned (who has those kind of curtain rods anymore?) and not tab top or eyelet like I need. Most of them were also full-length curtains, which I didn’t want for the study and living room, and I wanted to spare myself the pain of hemming curtains. Also, they were pretty much out of my budget; I’m a stingy – oh all right, thrifty – girl who doesn’t like to be put out of pocket. Eventually I found a nice plain red linen tab top half-curtain that matched the color scheme in the study, and even better it was on sale! $12 for one curtain! Yay me.
The living curtains were a bit more of a challenge. I wanted a light color so that the living room would look airier and brighter, and I wanted a leaf print or a geometric print. Needless to say nothing fit my criteria (bah ugly patterns) so my only other option was Ikea.
Ikea has some gorgeous fabrics that can be made into curtains by their in-house tailor, and I was really keen on spending a bit more to make the perfect curtains for the living room. But hubba’s thrifty side exerted itself, it was late, I couldn’t quite find the perfect pattern, so in the end we decided to take the inexpensive option – these light Hedda Blad curtains.
Although they’re long, Ikea gives a strip of fusible web tape, also known as iron-on fabric adhesive, to hem your curtains yourself. Now that I can do easily, because I don’t have a sewing machine at home (and the last time I used one was back in the 1990’s). Ikea does give instructions but I thought I’d put up a little tutorial of how I hemmed my Ikea curtains with the fusible web tape.
First I measured my current curtains – they were 180cm long, so I calculated that I would need to cut 70cm off my 250m long curtains. I laid them out on the dining table (you could use the floor) and folded the curtains at 70cm from the edge.
I used a contractor’s tape measure instead of a tailor’s tape measure because the contractor’s measure is stiff and I needed to make sure the fabric was folded at 70cm evenly throughout the edge. It’s not as difficult to be accurate as it sounds. Just line up the edges and make sure they’re straight, and then smooth out the fabric and slide the stiff tape measure down the edge to make sure it’s even throughout.
I pinned the edges with needles (I didn’t have round-headed pins with me) to make sure they stayed, then I brought the whole thing over to the ironing board to iron the crease flat. Yes that ugly blue-silver shimmery fabric is my ironing board – I never got around to making or buying a pretty cover for it!
That’s me ironing the crease flat. Sorry about the thing in the top right hand corner, that’s my camera pouch. It was hard to take a photo with my left hand, holding the pouch to stop it from dangling, and iron with my right hand at the same time! I used the hottest setting (linen) on my iron to get a good flat crease.
After ironing, I folded the crease up another inch or so and ironed that flat as well. The Ikea instructions don’t ask you to do this, and want you to basically have a raw edge in your hem, but that’s just too ugly and I couldn’t let that happen. Once I’d ironed the two creases, I unfolded that second crease and cut off the extra fabric just inside the crease line. The second crease should be wide enough to hide your whole fusible web tape.
You can see clearly in this picture where the creases are and where the extra fabric was cut off. Then I just unrolled the fusible web tape, laid it in the crease, folded the fabric back over it, and ironed over the whole thing to seal it in. I didn’t bother to cut the tape to size. What I did was to iron slowly by segments, unrolling the tape as I went. At the end you don’t even need to cut off the tape. Just press the iron down firmly on the edge of the fabric and pull lightly on the end of the excess tape. It should melt clean off and the excess will come away in your hand, so that you have exactly as much tape as you need in the hem. Again I used the hottest setting – you should ensure the fabric is tightly sealed before going on to the next segment.
Repeat!
Felt super happy with the clean hemming job and my new light day curtains!
Tuesday, 14 Jun 2011
A place to put pretty things
So after much dithering we finally got our display shelf from Scanteak – there was a sale advertised in the paper so we tromped on down to have a looksee. Picked this baby up for $499 (U.P. $799 I think). Beautiful solid teak and narrow enough to fit in the corner!
Lost no time in putting up some of my little elephants which have been living in a cardboard box since we moved in :/ Finally they get to breathe some fresh air again! I put out my favorites; and in order to try not to go overboard I put out one elephant for every other item on the shelf. Heh heh. Also you can see my two pretty To-fu Oyako figurines <3
The view from the other side. The shelf sits nicely between the window and our front door.
I bought this little glass container with a view to making a mini terrarium. King and King Wong is having a sale at Nex and they’re selling these beauties in all sizes and shapes. They’re kinda pricey though – this tiny one is already $20, and the bigger ones which would make better terrariums are going for $50 to $80. You can pretty much get a complete terrarium for that price. Sadly in Singapore we don’t really have thrift stores selling vintage kitchen ware or glass items like in the States, so this is it. Tell yourself you’re paying to have the fun of making your own terrarium!
I got this little chipboard “dream” from Spotlight. Like I’ve mentioned before, I love the idea of displaying words or letters, and this was perfect! The little elephant was given to me by my mother I think.
We picked up a new lampshade from Ikea as well – this gorgeous Renate one. Our previous embroidered lampshade from Ikea was beginning to get brown spots all over it and it was pretty much a goner.
It looks boring when it isn’t on, but when the light shines through it, it’s absolutely gorgeous and very me!
But of course Mister Murphy had other plans in mind. The same night we changed our lampshade and cooed over how pretty it was, the cat jumped up on the couch while I was snoozing on it. In my half-sleep I pushed Sasha off the couch in the direction of the lamp, she promptly knocked it over and it went sailing to the ground. The base cracked and now the lampstand is a goner :( The horrible thing is that my beautiful floor lampstand is no longer being sold at Ikea – it was the wooden Ekarp. Now they’re only selling the ugly chrome one, which doesn’t suit my living room at all. GRUMPS.
Just gonna have to suck it up and get another. Sighhhhh.
Thursday, 9 Jun 2011
Sunshine wedding pieces
So I did a custom order for my lovely funky colleague Shari…her wedding’s the weekend I’m away in Penang on Scrabble tournament duty so I won’t be able to attend and see my creations walk down the aisle! Boo!! I really had fun making this gorgeous wedding set and it was a real experience. I learn new things and invent new techniques every time I go on a crafty bend, so I’m so glad I had the opportunity to make this for her.
Shari wanted a full set of matching pieces – since all her wedding party members will be togged out in different outfits, she figured this would be the uniting element. Her wedding color is bright sunshiny yellow, so yellow it was, and such a happy looking set it turned out to be!
The guys got yellow satin corsages with green leaves. It was my first time working with floral tape and man, I love that stuff. It’s super awesumz for the job. To keep it manly, the corsage had simple glass bead centers.
The fathers, mothers and brother got slightly different corsages to differentiate them from the groomsmen. Papa and Bro have one pale green and one dark green leaf (pointing in different directions; I know, I’m a little crazy that way) and Mama got three lace cord loops. Very mommy, I thought!
The groom gets a special corsage, with two satin flowers and a polka dot fabric button, since Shari loves polka dots! I’m so happy I managed to find the matching thin polka dotty yellow ribbon to tie around all the corsages.
The bridesmaids got a two-flower hairband with satin and organza flowers! A simple and classic look, and one that I really love. I can’t wait to see pictures of all the bridesmaids in their mismatched outfits with matching hairbands. I think it’s a stunning and really clever idea to pull all of them together. If I’d had the luxury of having so many bridesmaids (though I was and am perfectly content and privileged to have had my beautiful baby sister as mine) I would have done the same thing. I love the idea of having them in mismatched dresses in the same color!
I’m so happy with the way my hairband tags turned out. Lookit my logo! <3
Blushing bride Shari wanted her own hairpiece to match the bridesmaids’, so I prettied hers up even more and made it more special by making it three flowers, with one of them delicate organza rather than all satin. I’m very pleased with the lace inset – makes it beautifully bridal and very sweet! Swarovski crystals, faux pearls and glass beads form the centers.
The last piece I made was this fun, chunky funky hairband for her wedding lunch. Since it’ll be more laid-back, Shari wanted a more dramatic piece with red as the accent color since her shoes would be this awesome red vintage Diane von Furstenberg pair (oh the things you can get on Etsy!). It was a joy putting this one together, with a 3D felt flower, one satin flower, a vintage fabric button and a red polka-dot flower to match her polka-dotted organza skirt for the occasion.
This whole wedding set would normally cost more than $300 :)
Monday, 16 May 2011
As Mattie says – claws on my paws
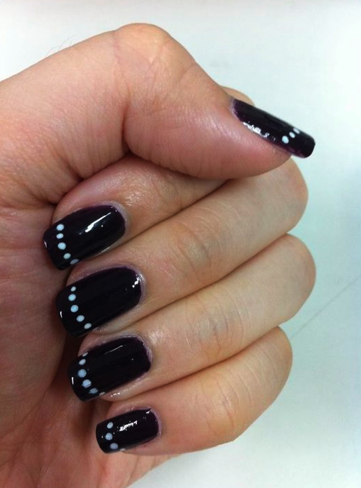
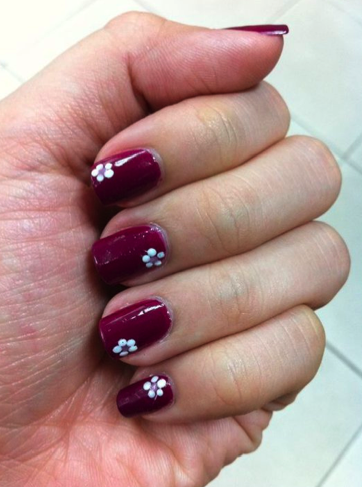
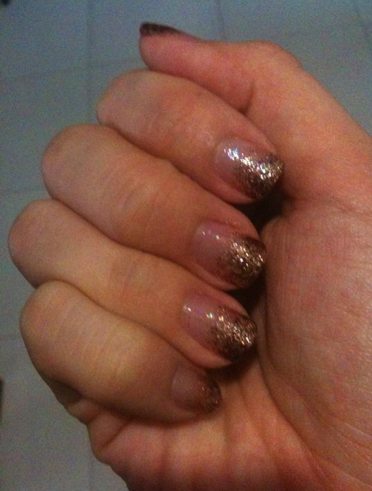
Some of my recent self-manicures:
I really love my dotting tool. I don’t know how I survived for so long without it. I’m starting to realize what a rip-off nail salons are – to charge so much to do something so simple! I’m not sure I can ever go back to a regular plain ol’ manicure anymore, now that I have the means to pretty up a simple manicure all by myself. This was a dotty take on a French manicure – base is OPI Siberian Sky, dots are in OPI Alpine Snow, which is probably the best investment ever.
Flowers on EVERY NAIL. Awesome flower power! I’m getting pretty good at doing them left-handed, too. Waiting for the day I am effectively ambidextrous. Heh heh. This one is two coats of OPI No Spain No Gain, with a single top coat of OPI Houston We Have A Purple, which has a gel or sorbet texture and therefore takes a lot of coats to look good on its own. Similar colors but different textures, and I really like them together. The flower petals are OPI Alpine Snow and the centers are OPI Second Honeymoon, the Barbie pink from my previous manicure post.
This is sheer awesomeness. Serene did one of these at the salon awhile back, though much less blingy; to get some inspiration and know-how, I Googled it and found a post by someone who also buys her polishes from Melva at NailVibe. Her blog gave me a lot of inspiration – I’m going to try her lace tips manicure next!
I did my tips in a metallic red by OPI – I don’t know what color it is because it’s in a mini sample bottle and it doesn’t have a name label. The copper bling is a pa polish called Lame Grande AA30 (I’m assuming they mean lamé), and the sheer glimmery polish is pa Lame Petite A125. I think Grande and Petite refer to the amount of glitter in the polish. I just bought another pa Lame Grande polish, AA36 – it’s not as black as it looks; rather it’s a clear polish with silver glitter and round pink shimmer dots. I’m all into glitter love these days – reliving my JC days where everything was glitter and rainbow spectra! Sounds a bit like 80’s disco, but much better.
I got the pa polishes from a pushcart in Junction 8, in front of G2000 on the second floor. They’ve got a great range of pa polish and nail stickers. I don’t get my OPI polishes from there because they cost an astronomical $22 (as compared to $10.90 and above on NailVibe) but since NailVibe doesn’t carry pa polish, I’m happy to pay $8.90 for them at the pushcart. I guess rent pushes up the price of the OPI polishes there.
I’m going to be ordering from NailVibe soon – Seche Vite topcoat amongst some other new colors – so if you’re interested in collating orders, let me know :)
Akan Datang
Super excited about the prospect of making an entire bespoke wedding collection for a fun and funky colleague :) will post the collection here when I’m done!
Sorry for the silence on the airwaves lately – work has been nothing short of crazy. More posts coming soon!
Tuesday, 19 Apr 2011
Speccies
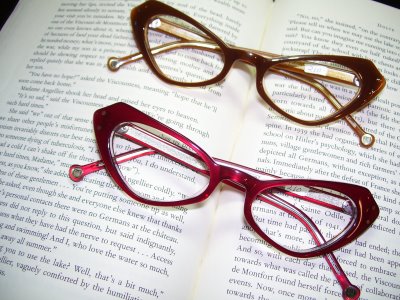
I haven’t been a speccie girl since I spent most of my first paycheck on LASIK. It’s something I’ve never regretted because it’s totally awesome to be able to wake up in the morning, open my eyes and have everything clear as day, no pun intended. You know how people with missing limbs still feel phantom pain? Well I have phantom spectacles – sometimes I’ll reach up to push my specs up my nose because I have the sensation that they’re slipping down – and I haven’t worn glasses for three years!
Specs have come back in a big way though – my students wear all sorts of funky specs, and my husband has, like, four pairs, and our friends are constantly buying new interesting pairs. It makes me a tad jealous, but everytime I try on a pair of glasses I’m reminded how dorky I really look with them on. They just don’t suit my face anymore.
Doesn’t mean I can’t look, though! Wanted to link this post with all kinds of lovely spectacles in them. Also, Eyes on Fremont has tons of cute spectacle looks that, yes, rouse the green-eyed monster (see what I did there?) in me.
And in case you’re interested, there’s a stall in Junction 8 right next to the old Ice Lemon Tee shop, in front of Royal Sporting House, that’s having a sale on specs. The hubs bought a new pair and they made it in only two days – $88 for frame+lens.
Thursday, 14 Apr 2011
Pretty in pink
I’ve done my nails a couple of times since my last manicure post but my iPhone camera isn’t cooperating :(((( for some reason it won’t focus on close objects anymore. I did a bright blue with silver streaks last week – my first attempt at cool colors – and I quite liked it! The only photo I have is fuzzy though :(
This week I went back to the tried and true diagonal French that I like so very much; this time with my new OPI Second Honeymoon, Alpine Snow tips and a lashing of Pearl of Wisdom over, just to give it a pearly sheen. I didn’t really like how very Barbie pink OPI’s Second Honeymoon was – a little too plasticky, a little too bubblegum. I used three coats because of how sheer these light colors are; put on the diagonal tips and then covered everything with a thin coat of Pearl of Wisdom just to make it a little more interesting! Lined it with my usual nail art glitter pen.
Added little heart stickers to the pink part of the nail on a couple of fingers, just to amp up the sweetheart look. It was a little odd at first. Now I’m getting used to the pink though; after about a week it doesn’t seem so jarring anymore. Shell did mention that it seems too girly for me (what’s she trying to say? :D) and I sort of agreed but now after getting used to it, it’s a nice change from my usual.
Mini garden
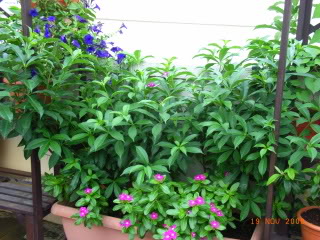
Disclaimer: my garden doesn’t precisely look like this anymore.
For one thing, my Blechnum Gibbum, the deer fern in the right corner, is slowly wilting away. Boohoo. I’m not sure why – though I’m guessing it might be lack of sun, though it’s supposed to do okay in the shade. I’ve isolated it and put it in the kitchen to try and revive it. Also, my impatiens isn’t quite that happy that it’s been raining and raining and no sun’s been coming in – at least I think that’s the problem; hope I haven’t overwatered it!
Gee, I suck at keeping plants alive.
Fingers crossed though – the rest of my plants are happy and alive, except the flowers of one African violet are past their prime.
Friday, 1 Apr 2011
More greenery ideas
On the way back home today I stopped by Far East Flora to pick up a few plants. I was holding on to my laptop and had to cab home, so I chose my favorite three first – I’ll get more tomorrow when hubba drives us there! I picked up a red impatiens, a zebra plant (which has the most gorgeous variegated leaves) and a fittonia. I rearranged the plants and dumped the last of the dying plants today because it basically couldn’t be rescued. So now I’ve got four plants out there, including the helicopter plant that’s courageously surviving everything, plus the arrowhead plant that I left at my mother’s place.
I’ve been stalking the GCS forums and they are truly inspirational. These people have serious skillz man. Sigh, people like my mother with super green thumbs – everything flourishes under their care. I’ve decided I love vertical gardens – it fills blank space and makes the most of the area while making sure things look natural and messy – I’m not really into the manicured look!
I especially loved these two setups – click on the pictures to go to the forum pages and read more on how they did up their own gardens. This first one is by a person with the same initials as my mother! Is that the key to greenthumbery?? And yes – I made that word up. I’m an English teacher. I’m entitled. So this is CK Yeo’s garden:
A favorite plant for many of the forummers seems to be the episcia – apparently it sprouts like crazy and makes lots of babies. Which is good, but I’m not entirely convinced by the thick, hairy leaves. Not the prettiest close up, but I might be forgiving of that if it’s going to be forgiving of my lack of, well, greenthumbery. There’s that word again!
This other very impressive setup is by user Davwong, who went and made his own bamboo rack for a vertical garden! *awe* it’s really gorgeous and I love the crazy garden feel – and, he used ninety pots in this one wall. *double awe* amaaaazing. I don’t even know how many trips he made to bring all those home, but boy was it worth it.

This is the rack he made with bamboo poles and cable ties – and here’s how he filled it up!
Is it not awe-inspiring?? I’m working on convincing my parents to try something like this – Dad’s handy enough with his hands to pull something like this off, and Mom’s ridiculous plant skillz will ensure her plants grow crazily all over this thing. Can’t wait to see it!
And in the meantime, I’ll slowly grow my own little garden. Baby steps… :D
Tuesday, 29 Mar 2011
Okay, so no green fingers
After my last post about my little corridor garden thing, all my plants proceeded to commit suicide. *cries*
Okay, to be honest, I think I murdered them. I bought this packet of flower inducer from NTUC which turned out to be a terrible mistake. All the plants I added inducer to proceeded to shrivel up, blacken, and die a terrible death. I now have three remaining plants, one of whom is dying a slow death, and the other two I hadn’t put any flower inducer in.
Sigh.
I’ve joined a local landscaping and gardening forum to try and wrangle names of hardy plants from them. The problem I’m facing is that lift upgrading is taking place now and sooner or later I’ll have to shift my plants into the house anyway. So I can’t get plants that are too bulky, or wimpy and unable to handle differing amounts of sunlight. I hope I can get some advice from these experts!
Some of the forummers have posted up pictures of their garden balconies – so so jealous!
Love the lush greenery of this little spot
This is probably how my corridor is going to look – that definitely is an upgraded lift lobby. Bamboo!
The frangipani tree is a DREAM for me. I love love love frangipani! Also the gerbera! And the little roses!
Can’t wait for my lift upgrading to be over so that I can have some permanence in my little garden. Or garden-to-be.


